
How to Track Email Campaigns with Google Analytics
Tracking email campaigns is an essential measure of business performance. Digital marketers rely on email campaigns to increase brand recognition, generate new leads, and bring targeted traffic to a landing page of choice. This short guide shows you how to track email campaigns with Google Analytics and is a must to determine the ROI of your campaigns.
Email is also an excellent communication channel to stay in touch with existing customers. People check their email more than their social media accounts – so if you are looking to strengthen customer relationships, there is no better outlet.
Of course, to achieve optimal results, you need to monitor what resonates with your audience by tracking email campaign performance metrics.
Why Should I Track Email Campaigns with Google Analytics?
Your email campaign is only as strong as the performance data it brings in. The goal is to have as many people as possible read the content of your email AND take the desired action.
An effective email should always have an actionable offering (an update from the business) or an incentive to keep reading (a discount on a product or free trial). Crafting the email is up to you – but when it comes to tracking, you need to ask yourself:
What is my email open rate? How many people are opening the emails?
Are new leads being generated?
Are new leads taken the desired action in the email (are they converting?) Did they sign up for my newsletter or make a purchase?
Having data-driven answers to these questions will help your marketing efforts thrive. To start tracking your emails, the first thing you need to do is install Google Analytics. Analytics is a free tracking software with tons of metrics and segmentation tools – just perfect for helping you increase click-through rates.
Using Google Analytics to Track Email Campaigns: The Basics
Once Google Analytics is installed, you can begin optimizing the software to suit your needs. Without any modification, Analytics will log the source of all traffic to your website pages. But after setting up an email tracking campaign, you will be able to see a new dimension in your traffic reports and discover a whole new world of traffic insight.
Step #1: Tracking URLs
Setting up URL tracking is a good idea whenever you are directing traffic from a source other than your homepage. It helps you know how effective your email campaign is in generating conversions (i.e., clicking on a link and landing on your website, for example).
Also, looked at over the long-term, URL tracking will show which emails brought higher than average conversion rates when compared with each other.
Trackable URLs break down differently for each traffic source:
● Email Campaigns. Allows you to see which emails are bringing in the most traffic and conversions.
● Guest Blog Posts. Helps you track the amount of traffic generated from a guest post on a different site.
● Influencer Marketer. If you are working with an influencer to promote a product, you should give them a trackable ID, so you know how much traffic is coming from their work compared to your email campaign.
● Banner Ads. Without a trackable URL, it would be hard to know which ad has the highest conversion rate.
Once your pages are trackable, the next step is adding parameters to each URL. Working with UTM parameters does mean delving deeper into the technical aspects of the platform. But it also guarantees more thorough reporting.
What are UTM Parameters and Custom Campaigns?
UTM parameters are little tags added to the end of a URL. Every time someone clicks on a link with UTM tagging; the information is sent back to Google Analytics. In short, UTM tags make it possible to isolate and measure different sources from where a searcher reaches your site. They are the buildings blocks for designing a custom campaign to monitor the performance of each source.
Custom campaigns are needed for every email newsletter promotion you want to track. You can measure key metrics and compare the performance of one traffic source with another over time.
For instance, let’s say you are generating tons of new leads from a new product offer. You want to know if your influencer marketing campaign is responsible for the spike in newsletter subscriptions, or if it’s coming from your newsletter. To check that, you need to set up custom campaigns for both your newsletter and your influencers newsletter, each optimized with UTM parameters. That way you can find out how many new leads are coming from your influencer’s newsletter campaign.
In general, segmenting data into categories via custom campaigns makes it easier to monitor the performance of specific traffic sources.
Step #2: Setting up UTM Parameters
The most important UTM parameters for all email campaigns are:
● Campaign source (utm_source). Usually listing the source of email list or newsletter (‘Welcome Email’ for example) where the link will be placed. This is where you can specify if it’s coming from an influencers account or not. Or if you’re promoting a social media post, I’ll type in Twitter or Facebook.
● Campaign medium (utm_medium). If you are running numerous email newsletters, you would want to differentiate them by publishing timeline (daily, weekly, monthly, May 23 Newsletter, etc.).
● Campaign name (utm_campaign). The name of the specific campaign itself (November eNewsletter, for example).
Consider filling out a Campaign Content (utm_content) parameter if you plan on doing any A/B testing. It lets you sort through the different links (image or text) that point to the same landing page URL.
Step #3: Using the Campaign URL Builder
Now that you know all the essential features of a campaign, it’s time to go ahead and build one. The Campaign URL Builder (save this link, you’ll use it often) tool makes it easy to start tracking your emails. Enter the following information:
- Website URL (the URL for the page or post that your promoting)
- Campaign Source (for example, ‘March Newsletter’)
- Campaign Medium (for example, ‘email’, if you are sending an email campaign)
- Campaign Name (for example, ‘sale’, but not required)
Once these four steps are complete, you will notice a ‘generated campaign URL’ pops up below the Campaign Content. Simply click ‘Copy URL’ and post it in your emails and share it with influencers, marketing collaborators, and business partners.
What Are Best Practices for Building Trackable URLs?
As with any technical domain, you want to keep things as simple as possible. With that in mind, you should pick a naming convention and use it every time. If you go ahead and make ‘unique’ names for each campaign title, it will be harder to remember which name applies to which data set.
A second recommendation is to use appropriate language throughout. Although it can get tedious working on website development, you have to remember that your audience will see the tags you write – who knew that branding gets so technical!
Step #4: Viewing the Results
Once you have let your campaign run for 24, you will start to see data coming in. To check the status of your email campaigns from the Google Analytics Dashboard, follow these steps:
- Sign in to Google Analytics
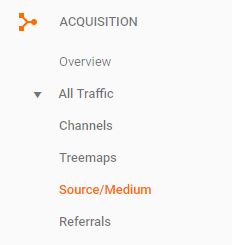
- Select Acquisition from the topics on the left navigation side-bar.
- Scroll down and select Source/Medium.
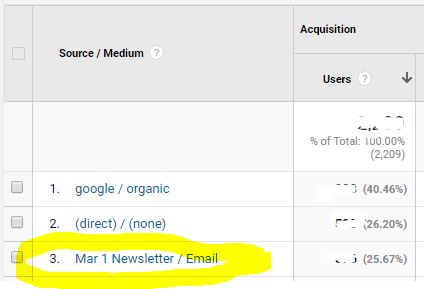
In the Source/Medium window, you will be able to see all of the different metrics for each newsletter that you send out. I like to review bounce rate, session, session duration, and goal conversions.
Conclusion
If you are not tracking email campaign performance, you should begin to track email campaigns with Google Analytics today! The more you know about the performance of your email campaigns, the easier it is to optimize them and make proactive changes for future email campaigns.